Showing posts with label decor. Show all posts

November 21, 2011

Not satisfied with my Christmas something...

So in my post Easy Christmas Something I said at the end that I thought I was going to try to add something to it and was pretty sure it was going to be paper christmas trees...well it was...sorta

Little triangle trees...I'm not sure why I stuck with this particular shape. I did try a few out but stuck with this...I can now see I have a crooked tree trunk that might annoy me but hey it doesn't have to be perfect.

I don't assume I have to help anyone figure out how to cut triangles out of paper, I did take pictures though...email me if you want to see them...

Anyway coming up this week hopefully I will finish these two projects:


The tissue paper poms, I have three more to hang but you know babies, they pick the worst time to decide to take a nap.

And this...


Its an old toy box, if you couldn't figure that one out. You'll see later what I'm doing to it...I am not painting over anything like those cool little vintage decals on the front. This one is just taking WAY longer then I wanted it to...so its not ready yet. After that I might be able to do a baby room tour, cause I'm pretty sure its done...for now...

Happy Monday!
(is that possible?)
-Tori


November 17, 2011

A tray re-vamp

I don't know what you would exacly call it but I saw somewhere a neat looking tray that someone had re-done and then didn't think about it again until I won a tray in a lot of stuff at an auction. So only paying $4 total including spray paint this is pretty cool to me....and I really loved how it turned out.


I really like all things vintage an am really loving silhouttes right now.

So materials:
The tray had some log cabin on it, mod podge (first time using it and i'm in love), spray paint in blue ocean, matchy scrapbook paper

Spray paint tray, I gave mine three coats and let it dry overnight

laid scrapbook paper in tray upside down and drew a line on the back where I needed to cut, i'm sure there are a million different ways to do this but this worked for me.

Did my best to match up another sheet to complete lining the bottom, it was pretty close.


Then I put a layer of mod podge down. I about freaked out when my paper started to bubble and thought all was lost but when it completely dried it was all flat again. You can't see it but my bubbles are on this picture. FYI cause I didn't know but you can use the mod podge to glue down your paper as well...it does say glue on the bottle (appearantyly I couldn't read that day)  In all I put down about 5 layers of mod podge.

I was going to sand down some of the sides and corners to rustic it up but I started and then didn't like it so I quit. I like it just the way it turned out.


Love the blue!

Happy Crafting!
-Tori


November 6, 2011

Time {not enough of it}

So in the quest to get normal everyday things done...cleaning, laundry and baby watching (omg she started crawling...why did I encourage this?) I haven't been able to create anything new. I have gotten as far in the craft room to see a drawer of unstarted/ half finished projects start to form, but I can't seem to make myself sit down  long enough to start them or finish them. (or finish cleaning up the room. ha) So instead while the baby took a nap, I took a pinterest break.

I find myself saving a lot of things like little sayings that make me laugh inside.

This is my craft room.


Fun projects to come up...


Really love embroidery right now...ever since the somewhere over the rainbow post.


Need this too...

It took me 50 minutes to make this post happen, only because I got on pinterest to find recently saved pins and got stuck looking up four hundred other things. 

Follow Me on Pinterest

Have a lovely night.
Happy Pinning...
-Tori

p.s. don't stay up too late...

October 31, 2011

My first tissue paper poms

So I have been wanting to try these for a while seeing as it was one of the only things left I wanted to do to the baby's room, but just got around to it because I kept forgetting to buy tissue paper. Anyway, I had one failure and two successes. Here goes...(and my pictures turned out horrible)

Add scissors to this and that's pretty much all you need

First one I did was two different colors so I alternated them

Then accordion style fold them as a group, about 1 inch folds. my paper was rectangular in shape so I went short side to short side...if that makes sense to you


You end up with something that looks like this. I forgot to take a picture but fold it in half to find your middle and then staple...I used three staples lol


Cut your sharp corners off of both ends...I don't reccommend doing it like this just because I didn't like it in the end and you'll see here in a minute what I mean.


Then you simply start pulling the tissue paper piece by piece out and up towards your stapled center. For one sided (half circle) pom ( it wouldn't really be a pom then?!) just pull to one side, for a full pom pull half the sheets towards on one side and flip over and pull the rest.


This is what I ended up with the first time I tried it, and didn't like it. The cut was something I didn't like either, not dramatic enough. When I really started thinking about it, it reminded me of the tissue flowers on sticks that you use to get from the fair...just stick a dow rod down it and you got a huge paper flower...my mind is running with ideas.

Anyway my little poms turned out much more how I thought they should, note to self use more then 6 sheets of tissue paper on a very large pom or you end up with what there is above. 

I did the same process with my little poms except where I stapled the first time I cut it in half and 6 sheets worked out perfectly.


I used cuter paper with those too... Not sure what I'm gonna do yet. I really like the flower idea but I really love the poms, gotta figure out how to use both in her room.

Happy Crafting.
-Tori


October 26, 2011

Its almost time...

For my favorite holiday...Halloween. Now I'm not sure if it was my love of candy or dressing up but I've always loved Halloween. We I carved pumpkins last night for the family. I have been sick all week and finally found a not so sick moment to post. This weekend we went to see family up north and they have a fright night in the area. I had never heard nor had I ever been to a zombie walk but was curious to see it.


I didn't get the best pictures as I was trying to keep warm by sitting on the side of the road that was sunny.

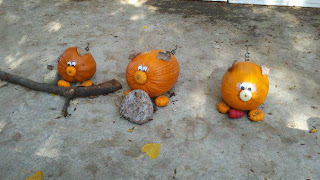
Then we went to the Halloween at the zoo. Where they had pumpkins everywhere and some were super cute, I had to share.


horse, pig and a cow made out of pumpkins

cute catepillar

think it was a dog, cat and a rabbit

three little pigs

It was a super fun weekend, hope you get to enjoy the fall festivities with your family!
Happy Halloween!
-Tori


October 14, 2011

Easy Halloween Wreath

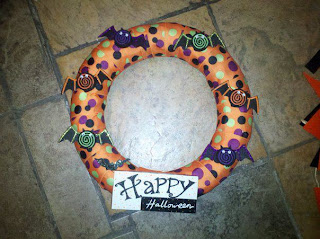
So I had already made a fall wreath which was my first attempt at ever making a wreath...cause I'm still new to all of this. After making my Halloween Bunting I thought I really needed to make a wreath to go with it instead of my semi boring fall one, so I came up with this...


It was all really simple and pretty cheap. Everything at Hobby Lobby was already 30% off which really helped. 

Started with my ribbon and a wreath form.


The pattern of the dots matched my bunting with the buttons. And it wasn't going to be super hard to attached ribbon to a wreath form. I used hot glue.


I bought this little sign too. I could have made one but I wanted to be quick here, the bunting took enough time.


Added the sign to the wreath which was just the right size because I didn't wrap my ribbon well and didn't have quite enough to make it around my form. I did pull the little wire hanger off of it.


I did buy the bats, 30 cents each...but you could easily make these bats with some felt, puff paint, and googly eyes.  The main body of the bat was two pieces of felt spiraled into each other and the wings were felt with the puff paint outline. I was very happy with how it all turned out and very happy that it only took me fifteen minutes to complete.


Happy Crafting 
-Tori


October 5, 2011

Pinspiration

Its my birthday! So in hopes of not being on here for forever I'm doing an inspiration post about some awesome things that have inspired a future project found on pinterest...

I'm sure by now that you have made it around to pinterest or at least heard about how awesome it is...you just have forgot to visit. Either way I pretty much spend forever on there when I decide to come sit down at the computer, usually after the baby is to bed and then I proceed to pin everything I see...because I can.

Anyway, I thought I would share with you my upcoming sometime in the near future project of using the printables found on pinterest to make a collage art of picture frames somewhere in my house, I haven't worked that detail out yet. So I thought I would share a few of my faves and a link to my pinterests....


Now I'm not sure in which room or order or how I might display these but thoughts have fallen onto these images of grouped frames...I'm heading in a colorful direction...

kitchen

stairway

my couch isn't this cute

I do have a nook upstairs

the computer is in the "man" room

I do have a fake fireplace

pretty much going to paint my bedroom furniture when my husband isn't looking, then I could do this :)

Anyway you look at it, there is too much inspiration and too much to look at on pinterest, here's the link to my boards... and of course to you could just go to pinterest.com. 
Happy Pinning
-Tori