October 31, 2011

My first tissue paper poms

So I have been wanting to try these for a while seeing as it was one of the only things left I wanted to do to the baby's room, but just got around to it because I kept forgetting to buy tissue paper. Anyway, I had one failure and two successes. Here goes...(and my pictures turned out horrible)

Add scissors to this and that's pretty much all you need

First one I did was two different colors so I alternated them

Then accordion style fold them as a group, about 1 inch folds. my paper was rectangular in shape so I went short side to short side...if that makes sense to you


You end up with something that looks like this. I forgot to take a picture but fold it in half to find your middle and then staple...I used three staples lol


Cut your sharp corners off of both ends...I don't reccommend doing it like this just because I didn't like it in the end and you'll see here in a minute what I mean.


Then you simply start pulling the tissue paper piece by piece out and up towards your stapled center. For one sided (half circle) pom ( it wouldn't really be a pom then?!) just pull to one side, for a full pom pull half the sheets towards on one side and flip over and pull the rest.


This is what I ended up with the first time I tried it, and didn't like it. The cut was something I didn't like either, not dramatic enough. When I really started thinking about it, it reminded me of the tissue flowers on sticks that you use to get from the fair...just stick a dow rod down it and you got a huge paper flower...my mind is running with ideas.

Anyway my little poms turned out much more how I thought they should, note to self use more then 6 sheets of tissue paper on a very large pom or you end up with what there is above. 

I did the same process with my little poms except where I stapled the first time I cut it in half and 6 sheets worked out perfectly.


I used cuter paper with those too... Not sure what I'm gonna do yet. I really like the flower idea but I really love the poms, gotta figure out how to use both in her room.

Happy Crafting.
-Tori


October 27, 2011

Loving...

Days of Chalk and Chocolate

One of my new favorite blogs, they have a linking party going on now here...


Follow my boards on pinterest here...  Follow Me on Pinterest


October 26, 2011

Its almost time...

For my favorite holiday...Halloween. Now I'm not sure if it was my love of candy or dressing up but I've always loved Halloween. We I carved pumpkins last night for the family. I have been sick all week and finally found a not so sick moment to post. This weekend we went to see family up north and they have a fright night in the area. I had never heard nor had I ever been to a zombie walk but was curious to see it.


I didn't get the best pictures as I was trying to keep warm by sitting on the side of the road that was sunny.

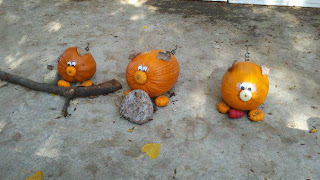
Then we went to the Halloween at the zoo. Where they had pumpkins everywhere and some were super cute, I had to share.


horse, pig and a cow made out of pumpkins

cute catepillar

think it was a dog, cat and a rabbit

three little pigs

It was a super fun weekend, hope you get to enjoy the fall festivities with your family!
Happy Halloween!
-Tori


October 20, 2011

Baby Room: Cardboard baby name

We recently moved to a much larger living arrangement and I was so excited to decorate my babies first room. I had been looking up rooms for months and months. Finally it was time to decorate and I started with her name above her crib first. This was before I really started taking pictures for more tutorial purposes and just took them to post on my facebook page.

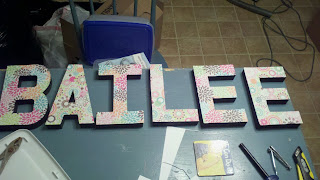
Either way heres pretty much the only picture I have from the project.

I bought the chunky letters from hobby lobby in the section where there is blank wood to paint on. and I went to the scrapbook paper section and picked out my favorites. I had painted her room and light gray and wanted to do something super colorful with everything else in the room.

I painted the sides of the letters black so the colors on the front would stick out more. I traced the letters onto the back of the scrap book paper and cut them out and just glued them on with regular school glue and let them dry. 

Hanging them up was a whole other problem but you can figure out what works best for you, probably would have been good to get the little picture hangers and hot glue them to the backs of the letters...but hind sight is 20/20.

Finished product:


too cute, must finish to pom that are to go in another corner of the room, thats for another time
Happy Crafting
-Tori


October 18, 2011

Pinspirational: somewhere over the rainbow

So excited to get to share all this stuff with you, it is so hard to find time to blog sometimes. I can write out a bunch at once and let them post all week which is great cause Friday seems like the only time I have to be able to do this.

I found this project on pinterst. It is a total copy, just because I liked it so much! The original blog is here.

Original photo.

Pinned Image

My project...
I used some scrap fabric I had laying around. Used a pen to draw the outline of a 5X7 frame and the word somewhere...


It wasn't perfect and this is my first time doing this, haha I don't even know what this is called...


I had to break out all the buttons, including the vintage jarred ones to find all the rights colors. I think I found pretty good ones. 


Then I added my little blue birdies. I have yet to find a frame that I liked for this and I think its about time for a trip to ikea so I am sure I can find one there that I can do something with. 

Happy Crafting
-Tori

October 15, 2011

Daddy's birthday present

A little bit ago I told y'all it was my birthday, well my husband and I share a birthday, weird right? So for his birthday present me and my B made him a present.


I found this idea off the blog apartment therapy. Which of course I can't find the link to link it to right now.
Anyway I bought 7 packs of crayola 8 count crayons to do this with. I added them to my canvas. Thinking ahead I thought that the hair dryer might re-heat hot glue and my crayons would start moving...I don't know if this is true, I just didn't want it to happen. I used fabri-tac...and I used too much, you probably need 1/4 less than what you see on there. ( if you can see it)


So I added all my crayons in the roy g biv kinda way and made sure all the crayola labels were facing out. Then I melted them with a hair dryer.


We did this in the garage because the crayons do this splashing thing. Very hard to hold a baby and accomplish this but we had to make it together!

Final product, the yellow got kinda lost...maybe do it last? 


you can melt to your hearts content, just keep reheating sections of the canvas if it gets all goopy in one area.

Then it was time to add the special touch.

The paint!

My little helper.

The next part couldn't be taken a picture of because we were kinda messy and my husband wasn't allowed in the house.


Completely finished product. The letters look funny on here and if I had it to do all over again, I definitely would have picked a different color paint...maybe yellow. And it is very hard to wrangle a six month old to make hand prints and feet prints when you yourself have paint all over you. OOh and use a non toxic paint...AND don't leave this in your car. haha

Happy Crafting!
-Tori


October 14, 2011

Easy Halloween Wreath

So I had already made a fall wreath which was my first attempt at ever making a wreath...cause I'm still new to all of this. After making my Halloween Bunting I thought I really needed to make a wreath to go with it instead of my semi boring fall one, so I came up with this...


It was all really simple and pretty cheap. Everything at Hobby Lobby was already 30% off which really helped. 

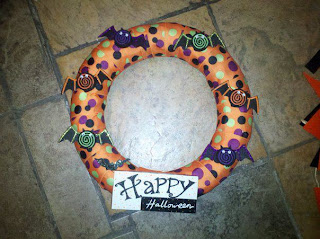
Started with my ribbon and a wreath form.


The pattern of the dots matched my bunting with the buttons. And it wasn't going to be super hard to attached ribbon to a wreath form. I used hot glue.


I bought this little sign too. I could have made one but I wanted to be quick here, the bunting took enough time.


Added the sign to the wreath which was just the right size because I didn't wrap my ribbon well and didn't have quite enough to make it around my form. I did pull the little wire hanger off of it.


I did buy the bats, 30 cents each...but you could easily make these bats with some felt, puff paint, and googly eyes.  The main body of the bat was two pieces of felt spiraled into each other and the wings were felt with the puff paint outline. I was very happy with how it all turned out and very happy that it only took me fifteen minutes to complete.


Happy Crafting 
-Tori


October 5, 2011

Pinspiration

Its my birthday! So in hopes of not being on here for forever I'm doing an inspiration post about some awesome things that have inspired a future project found on pinterest...

I'm sure by now that you have made it around to pinterest or at least heard about how awesome it is...you just have forgot to visit. Either way I pretty much spend forever on there when I decide to come sit down at the computer, usually after the baby is to bed and then I proceed to pin everything I see...because I can.

Anyway, I thought I would share with you my upcoming sometime in the near future project of using the printables found on pinterest to make a collage art of picture frames somewhere in my house, I haven't worked that detail out yet. So I thought I would share a few of my faves and a link to my pinterests....


Now I'm not sure in which room or order or how I might display these but thoughts have fallen onto these images of grouped frames...I'm heading in a colorful direction...

kitchen

stairway

my couch isn't this cute

I do have a nook upstairs

the computer is in the "man" room

I do have a fake fireplace

pretty much going to paint my bedroom furniture when my husband isn't looking, then I could do this :)

Anyway you look at it, there is too much inspiration and too much to look at on pinterest, here's the link to my boards... and of course to you could just go to pinterest.com. 
Happy Pinning
-Tori


October 4, 2011

Halloween Bunting!

I finally get time to share my Halloween bunting (I have to work in 34 minutes, lets hope I can get this all in by then).

Finished product

So I started with four large sheets of stiffened felt from Hobby Lobby. And Borrowed a pennant from a friend as a guide.


My orange on orange triangles there.

I ended up with 40 triangles, ten from each sheet. and used sisal also found at Hobby Lobby to string them together.


Between pieces I used three fingers wide to space them out and hot glued the felt and then added the string to it about one centimeter in.


Bad picture but this was later at night and my phone camera wouldn't flash. Anyway here are a few strung together.

I was going to just stop with this but earlier in the day I had gone to Hobby Lobby again thinking I needed to make a Halloween Wreath, I bought polka dotted ribbon for the base and decided I needed to make this match. 

On a previous crafting venture I had bought buttons in a bag or a bag o' buttons in the scrap booking section at once again Hobby Lobby. I decided they were my perfect polka dots


I only used black, green and purple to mimic my wreath. I did about three triangles at a time and placed the buttons first to make sure I liked how they looked and then I hot glued them down, be careful not to burn your fingers because buttons do have holes in them and glue does come through said holes and will burn your finger (true story).

And then swagged it across my small porch. I made sure not to completely tie it down yet because my husband is 6'4" and didn't know how he would fit under it and later I had to move it up so it wouldn't conk him in the head every time he walked under it. 

Hopefully this inspires you to make something!
Happy Crafting
-Tori