November 13, 2011

Christmas Wreath!

So I have seen the yarn wreaths here and there...plus my incredibly talented sister made a super cute gray and yellow one, I knew that I needed to do that next. Originally I was going to make a burlap Christmas wreath but I could never get the red burlap. What I came up with is super cute anyway, at least I think so. (my sister said it was too) Anyway also in this post I actually edited pictures! haha I usually take all pictures on my phone, nevermind that $700 camera sitting in the other room, my android works well doing whatever, and I have an app for picture editing...takes too long to do it on my phone so guess what I'm asking santa for?! Anyway down to business...

I went to hobby lobby with no idea besides yarn that I knew I was going to use. So while winging it I was randomly picking things up and finally something struck me.

Stuff I used: 18 inch wreath form, red/white yarn, peppermint gift tags, one red sign and one hollow cardboard sign, chalkboard paint, foam brush, hot glue, scissors (n i think thats all) oh and white paint pen

wrap your wreath form and wrap and wrap and wrap...this part takes a while, watch a movie

done yet? ok wrap your white in sections around your form, up to you how far apart you want them

get all the way around, tie off and go back the other way, easy to cross over wreath and aim for the bottom of the cross before
like this.

done...not where you want them or not even? best part is you can play around with them until you like what you see.

next I placed everything where I thought I wanted it...
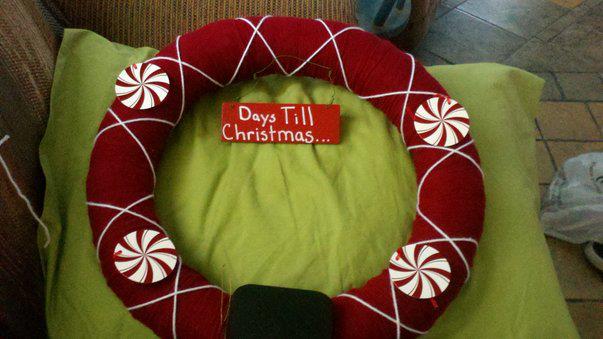
but maybe i was wrong...
nope I was right, then hot glue in place

While wrapping the wreath ( did I mention it took a while) I got bored and painted my first sign
I free handed it, think it looks funner that way...I used a paint pen (see it on the very edge of the picture) pick on up at walmart, best idea ever...eventually I went over this again and added little dots to the corners of each letter
subtle but cuter I thought

attached the sign using two strands of yarn (not a good picture)
stuff for chalkboard sign, never used chalkboard paint before
I had previously added chalkboard paint to the cardboard sign, 4 coats just to make sure I got it right, and then I took my paint pen and made little dots around the edges of the sign. I think I like dots today.

attach with hot glue and DONE!


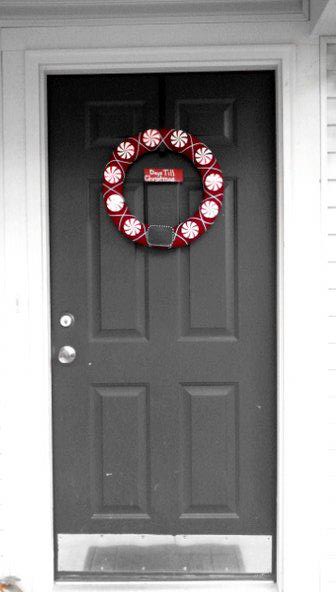
Just add Chirstmas lights and yay...my front door is green and this doesn't look very green but thats why I made a red and white wreath!

Definitely the longest tutorial type thing I've ever done on here, but I'm pretty proud of my project that didn't only take me 15 minutes.

Happy Crafting!
-Tori


November 12, 2011

Quick note...

I have my first follower...yay me (haha no pun intended) Anyway makes me happy to realize someone is reading this and possibly enjoying it enough to follow me! Thanks you made my day!

Hopefully be posting the Christmas wreath tonight...its gonna be good...at least in my head it looks awesome.
Happy Saturday!
-Tori


November 8, 2011

Ribbon Storage

So if you are like me then you have tons of ribbon, you don't have a decent place to put it and you are constantly winding it back up. In my organization of my new craft area I have used simple little baskets to make my ribbon easy to use.


My ribbon bin runneth over...I make tons of little hair ribbons for this ribbon monster


The Monster

Super simple idea of just pulling ribbon through the holes in the baskets and then you have


which works well for me cause I can just pull out and measure the length I need...

I got stacking baskets and use the bottom one for all of my hair accessories, clips, brads and all that good stuff.

Fun easy and done in fifteen minutes...only cost $5 too, instead of those fancy holders you can pay $15 for at Joann.

Happy Organizationing
-Tori


November 6, 2011

Time {not enough of it}

So in the quest to get normal everyday things done...cleaning, laundry and baby watching (omg she started crawling...why did I encourage this?) I haven't been able to create anything new. I have gotten as far in the craft room to see a drawer of unstarted/ half finished projects start to form, but I can't seem to make myself sit down  long enough to start them or finish them. (or finish cleaning up the room. ha) So instead while the baby took a nap, I took a pinterest break.

I find myself saving a lot of things like little sayings that make me laugh inside.

This is my craft room.


Fun projects to come up...


Really love embroidery right now...ever since the somewhere over the rainbow post.


Need this too...

It took me 50 minutes to make this post happen, only because I got on pinterest to find recently saved pins and got stuck looking up four hundred other things. 

Follow Me on Pinterest

Have a lovely night.
Happy Pinning...
-Tori

p.s. don't stay up too late...

November 3, 2011

My craft room

So it was always my thought that I would have a place of my very own to work on my ever growing collection of crafty items. We moved into this huge new house from a tiny apartment and this is what I got...


a spare room with a queen size bed, a chest o'drawers and another chest o'drawers that includes a mirror.

This picture is after my husband decided to throw all my stuff up in the room to get it out of the garage.


So instead of blogging I have been working to clean up this room. Which hasn't gotten very far with a husband, baby, and company coming over to have dinner...but I'll get there. Also notice the funky color of the room and then the trim...yellow?! Who had this house before us? 
Anyway back to the grind,
Happy Cleaning!
-Tori